Introduction
This article was prompted by the many folks who have told me that they would have started making armour if they had only known that they didn’t need to spend a fortune buying tools – and were generally surprised that tools like an Anvil were fairly far down on the suggested list of armour tools. In point of fact, as of this writing (March 2013) I don’t have an anvil in my shop, although I’m currently looking for one for tool-making. My guesstimate for the cost to “equip” a minimal armoury is under $500 if you are buying completely new tools, and you can probably do it for under $200 (and possibly under $100) using the stuff you have lying around the house and going garage sale crawling. Some of the most expensive stuff in my “must have” tools are things like blocks of lead and bars of steel, both of which can be picked up at scrap yards for not a lot of cash.
If you don’t know what some of these tools are for, or what the techniques are there is a good chance that there is either an article covering it on this site or if it isn’t there yet, it’s probably on my “to do” list – hit the “contact” link and ask and we’ll see about reprioritizing it.
While this isn’t really a construction technique, I haven’t yet made a category for “other stuff”. Note that this list of equipment is sufficient to make gothic gauntlets, a gorget, a coat of plates (all of which have instructions on this site) or full arm and leg harnesses (instructions likely to come) so please don’t think of these “beginner” tools as limiting your capabilities. While you could build a helmet with these tools, for thicker materials (particularly if you are rolling the edges) heat is your friend and you should start strongly thinking about things like torches, forges and the like. It also lets you get into carbon steels and tempering…
For making metal armour there aren’t really a lot of discrete operations: in general almost all pieces of armour from the 15th century on will require:
- Environmental / Safety: If you can’t afford to protect yourself from sharp edges, particulates and noise you aren’t going to have a very nice life, let alone have fun in the shop.
- Patterning: Make the right (flat) shapes to transfer onto the metal – the shaping techniques used will influence the pattern.
- Cutting: removing the right shape(s) from your metal, whether this is sheet, bar or “other” material.
- Abrasives: Whether you are filing or looking at bulk stock removal to make tools, you are likely to need to “tweak” your cut pieces, or at the very least take the edges off so that you aren’t bleeding while trying to work with them.
- Gross Shaping: For most armour this is things to bang on and with – hammers, anvils and stumps.
- Fine Shaping: You will need tools to get the lumpy bits out. Fortunately these don’t need to be $200 jewelers stakes.
- Punching and Riveting: You almost always need to put things together, and if you aren’t raising (the tools are somewhat expensive) or welding (also expensive) you are probably doing assembly with rivets.
- Strapping: I’m hard pressed to think of a piece of armour that doesn’t have leather somewhere to hold it on or hold it together.
- Polishing: if you aren’t polishing it’s really hard to tell where your mistakes are, and how to fix them. This gear is also needed if you are making tools, because rough tools make ugly armour.
So lets take a look at each of these areas, and what cost-effective options are out there to do them.
Environmental / Safety:
If you expect to learn how to make nice armour, it’s going to take time, and to maximize the amount of time you spend doing your hobbies you should minimize the amount of time you spend in hospital having little metal fragments taken out of your eyes, in chemotherapy after breathing too much polishing crud or in a hot shower trying to get the kinks out of your back. You also want to make sure to have enough light, because if you can’t see what you’re doing, it will look bad once brought into the light of day
I favor big banks of fluorescent bulbs because they provide “linear” light that lets you check curve consistency by “rolling” the light across a surface – if the light “ripples” you have an inconsistent curve. I do a lot of fine work (jewelers saw work, so sub-mm tolerances) so my “minimum” light density is about roughly a 4 foot fluorescent light for each 30 square feet (3 square meters) of shop space – my 15′ x 15′ (5m x 5m) shop space has 2 of these 4-bulb fluorescent units, and it’s at the bottom end of usable for me.
Minimal safety gear in my shop (used appropriately – most of the time I’m just wearing my glasses and hearing protection) is eye protection, gloves, hearing protection, and a respirator that will handle tiny particle sizes. I’ll also add some notes about having your tools at the right height – I aim to have my work surface roughly at my waist so that tools and so forth are at a convenient height.


In putting together the “basic” set of tools I realized that a vice, despite not being present in medieval armouries, was probably the most used “expensive” tool in my shop. Without a vice, you’ll be very hard pressed to make hinges, and you won’t have anything to hold the steel bar that I’m suggesting in place of an anvil for making simple curves (like gauntlet cuffs or vambraces) It’s also handy for holding tools like planishing and fluting stakes.
Patterning
 This is largely an article about what tools to use, not how to use them: rulers, cardstock (for rigid patterns – paper patterns are hard to use) and compasses make layout and pattern transferring easy. Note that the ruler in this picture has a lot of holes in it – this allows me to put a pin through one of the holes and get large diameter curves easily – important for consistency in some armour patterns like helmets, breastplates and pauldrons. You will also note that there is a pair of steel dividers (left) and a compass with lead (right). The dividers are used to transfer distances onto steel, while the compass is used for paper patterns.
Cutting
 I always hear that armourers need a Beverly shear to do armour. I’ve heard it for years, and it just isn’t true. When making gauntlets and other “finicky” work I tend to use a jewelers saw because the extra time taken to saw the metal out is more than offset by the reduction in flattening and deburring tight curves cut with a shear. I also recently discovered that Robert Macpherson, arguably the best armour in North America for a number of decades, has never used a Beverly Shear. So what does he use instead? A saber saw (often known as a jigsaw) with fine blades seriously clamped down to his working surface to reduce vibration. For smaller pieces with thin metal you can also use tin snips, although these are a bit tricky to use and need lot of clean up.


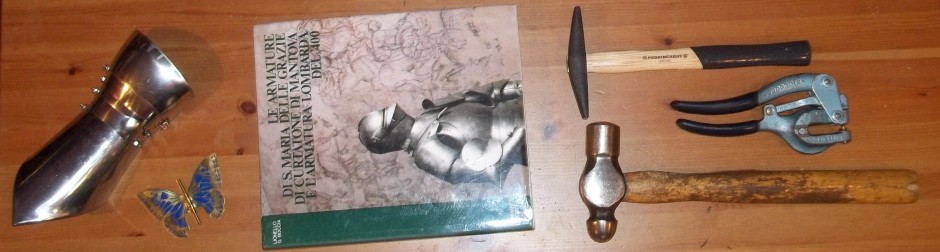
For trimming rivets and other small stock to size, I really like my linesmans’ pliers (red handles) since they have crazy mechanical advantage and will happily clip 1/8″ stainless steel rivets without destroying my hands. The needle nosed pliers get used for clipping wire and forcing Jewelers rivets (1/16″ wire domed on both sides) through the appropriate holes. I’ve also included a second pic of a jewelers saw and the V-Board that you need to support the work while cutting.
Abrasives
 After cutting things out, you almost always need to clean up the edges so that they aren’t sharp, or remove extra material in very tight places. You will also need to make your own tools if you are on a budget, which means you will need something to change the shape of hammers and other large metal. My “must have” power tool is a right angle grinder, and I have one for grinding and one for polishing: these cost from $10 – $50 for the inexpensive ones, up to the multiple hundreds for nice autobody sanders. I’d suggest an inexpensive 4 1/2″ one to start, or an inexpensive 5″ version if you are planning on making large sinking (dishing) hammers immediately – the time savings are probably worth the extra money.
  You will probably want to spend some money on a sanding attachment and some of the finer sanding disks for making tools. The other “must have” is good files: I like the Nicholsons, which are generally available (made in North America). They are significantly more expensive than “cheap” files, but if you are working with metal instead of wood the better quality is needed. A good file will happily put a notch into your pocket change with a single stroke and it won’t take a lot of effort. I store my files wrapped in inexpensive quarter-cut leather since this keeps them dry, oiled (the leather has a bit of oil left in it) and makes sure that the files can’t bang into each other or my other tools.
Gross Shaping
 Much of your time when you are a beginning to intermediate armourer is going to be spent trying to get the shape of pieces right, whether that is the right depth to the dome of a helmet, the right curvature on a breastplate or correctly matching up articulations. As you get better you will probably spend less time on gross shaping and more on fine shaping and finishing, but the tools are likely to remain very similar. For most rough shaping you will need an assortment of hammers, some chunks of metal with nice surfaces, and the most used piece of equipment, a big old stump. I prefer a stump about 18″ (45 cm) in diameter and ~30″ (75 cm) tall, which is a comfortable height if I am sitting on a stool in front of it. If you look at the stump you will see a couple of areas where I have made depressions of varying depth and diameter,
  which helps to make deep curves, while there are some shallow depressions formed by simply hammering metal onto the surface. The hammers that I use are generally modified ball-pien hammers with their front (flat) faces made into a very gentle dome – the large one (3 lb) second from the top has been in fairly constant use for over 20 years. The little one on the top (8 oz) is one of my most-used hammers, since it gets used to roll edges and pean rivets. Buying a jewelers sinking hammer at $100+ with a maximum weight of about 20 oz (600g) is not as appealing as making your own. The next photo has my “light helm masher” which is a 4 lb hammer, while my “Grond Smash” hammer is a cut down 10 lb sledge with one domed face – no, I’m not posting a photo of it. When folks find out that I use wood to hammer into I invariably hear:
“But What About an anvil? Surely you need an anvil to make armour!”
If you look at medieval depictions of armourers you will invariably see that they have an anvil, tongs and lots of hammers. the anvil may be square, and may have been made of fairly soft iron. Why did medieval armourers use anvils so much? Remember that medieval armourers did not get nice rolled sheet like we do, they got roughly hammered sheet of varying degrees of thickness, or even billets of metal. As a result much of their work was preparing their raw material (which is much easier to do hot) or just smashing it into “close enough” shape and then grinding away a significant chunk of the surface so that it was even on the outside. Most medieval armour is very rough on the inside, but you don’t generally get to look at the inside of armour! To compensate, they tended to use a lot of different types of hammers – above you will see a peddinghaus combination cross and straight pean hammer – which cost as much as the rest of the hammers shown here put together, probably with some cash left over. Because we get almost perfectly flat and uniform sheets of steel working cold (and trying to minimize deformation) is a viable technique for us. Working into wood (the big stump) is a good way to stretch metal (dishing or doming it) without scarring it up. You will note that the other two hammers in the first hammer photo are runner or plastic – excellent choices for working on the outside of a piece without scarring it up.


I don’t currently have an anvil in my shop and use a variety of metal objects depending on what I am trying to accomplish: the most used chunk of metal in my shop is the one in the middle of the first picture above, which is a piece of 1/2″ steel plate polished to a mirror finish with a few “dimples” carved into it for holding round headed rivets. It mostly gets used for evening domed surfaces by flattening ripples from the inside using one of my (many) slightly domed hammers. the railroad track (on the right) gets used when I need a very hard surface to hammer onto (not often used, usually when making new tools) and the bar locked in the vice (photo on the right, above) gets a lot of use, basically replacing an anvil horn (and then some) since I can flare and raise on this for pieces up to 24″ (60 cm) – you will be hard pressed to find an anvil horn that size, and this (stainless) bar cost me less than $50: the mild steel one that it replaced cost me less than $10!
 For very tight curves such as finger tips, galdings (knuckle plates) and the like, as well as a resistive backing plate for starting fluting lines I use a lead block. While I could form my plates with the help of a torch, the lead block does a good job for most small components. This chunk of lead is about 30 pounds (14 kg) but a smaller piece would work just as well since the primary formation mechanism is that the lead deforms around the outside of the shape, supporting the piece and ensuring that the metal stretches evenly.
Fine Shaping
 Once you have done your rough shaping, you will need to do the fine detail work: whether this is simply smoothing out a few errant hammer marks or some serious fluting, much of this can be done by re-purposing existing tools. A jewelers planishing stake will set you back a couple of hundred dollars, a “do it yourself” version like the one described here will cost you about $20 and a few hours of your time. The smaller “stake” is a converted rail spike, which was discarded on a railway siding and took about an hour to straighten and put a nice rounded (and polished) head onto it.
  The other end is also useful as a fluting stake or to do edge roll fine tuning on, depending which way you mount it into the vice. Chisels and jackhammer blades are generally good quality tool steel, and can be readily ground into useful shapes for fluting and creasing stakes. Center and nail sets can be rounded and used as doming punches for decorative details, or shaped into chasing chisels
Punching and Riveting
You are going to need something to hold things together, and one of the most common solutions was rivets. While the actual execution of articulation rivets is somewhat different than leather rivets or “hard” rivets (used to hold solid objects like helmets together) all of them need holes through the two pieces of metal that need to be attached, a rivet to drop in the hole and backing to hold the rivet on while it is upset with a hammer – presto, you have joined the pieces together.
 The most cost-effective solution to make those holes is a hand drill, preferably a variable-speed corded drill since it will provide more power for your dollar. The variable speed is important, since some materials like stainless and carbon steel cut more effectively at low speeds. Arguably more important than the drill are a good center punch to make starting the hole withut the drill bit skating off your work, and high quality drill bits. I strongly reccommend using titanium nitrile drill bits: they are about twice the price of “standard” (black) high speed steel drill bits, but they will drill about 50 holes through stainless steel, while the high speed steel bits tend to melt into the first hole you try to drill. This is less of an issue for mild steel, but going by the cost per hole instead of the cost per drill bit the more “expensive” bits are a fraction of the cost of the cheap (as opposed to inexpensive) ones.
 Since we are talking about cost-effective options, Rivets, even mild steel ones are fairly expensive, particularly if you are purchasing them in small lots and getting them shiped to you. There is another option, found in almost every hardware store – nails. Common nails have shanks that are roughly 1/8″ in diameter, with heads almost exactly 1/4″ in diameter. This is almost identical to the sizes for “flat head” rivets, and if the rivet “head” is on the inside it will be almost impossible to see that the “rivet” is actually a nail. The only real adjustment to make is that if you want a tight fit you will need to drill a 9/64″ hole instead of a 1/8″ hole. In addition to common nails, Roofing Nails with their larger heads make excellent “arming nails” for holding leather to metal. Finally, if you need a number of small rivets (for edging and so forth) you can use 14 Ga wire (which is just over 1/16″) to make jewelers rivets. For holding pieces together temporarily (such as when testing articulations) bolts are indespensible: I actually buy SAE#5 bolts which are closer in tolerance to 1/8″ rivets than the “standard” 1/8″ stove bolts, which are generally SAE#6
Strapping
 If you are making armour, almost every piece has leather holding it together or holding it on somewhere. As with some of the other components that I have mentioned, leather is one of the places that you don’t want to try and “save” money – straps should be made of good latigo, and high quality leather should be used to hold together components that use leather to articulate them: this includes pauldrons, some leg harness components and many faulds. While you can get strapping cutters, part of the tool collection you already have is a good steel ruler, so save those pennies and get a good craft knife (I like the Olfa brand). Rotary leather punches are now incredibly inexpensive (I recently saw some new ones for around $10) so this is no longer at risk of breaking the bank – when I started doing armour the “inexpensive” English ones were about $50 each. As noted above, roofing nails make dandy rivets and while you can buy buckles, they really are fairly easy to make (and will look and work better if you do)
Polishing
 When you are finished, you really should polish your work if only so that you can see where you made mistakes that need to be fixed the next time. You will also want to polish any tools (hammers and planishing stakes) that you build, since any surface imperfections will get transferred onto the surface that they are in contact with. If your hammer has a scratch on its working face, you will put a little “ridge” into whatever you are hitting with that hammer every time it makes contact, and that’s a bear to clean up! Fortunately, you already have a vice and an angle grinder, so all you need is a muslin buff with the correct sized arbour hole (generally 5/8″) and some white tripoli (used for polishing steel) and you are off to the races. There is a limited amount of depth available to put a buff into an angle grinder, so buy the thin pads, and note that they will take a bit of work to get onto the arbour. You will also need a number of safety precautions, since this configuration is definitely not covered by warranty and standard operating procedures and requires the demounting of the guard.
- Make sure that the grinder direction is toward the ground, since catching an edge will throw your piece around – into the ground is the least bad option
- Wear your respirator and eye protection because cloth buffs are not designed to be operated at this speed and they will shred.
- Wear gloves, because polishing makes metal hot!
- loose fitting clothing in close proximity to high powered spinning objects is a bad idea. A leather apron is a nice to have option, but I tend to wear at least jeans and long sleeves, just nothing baggy
Copyright 2013 Scott Martin
Last Updated March 29, 2013
Tjankfor showing me how to make simple things into basic armouring tools.