Notes on the construction of a Wisby Type 1 Coat of Plates
(Based on a burial near Wisby in 1361 AD)
 |
 |
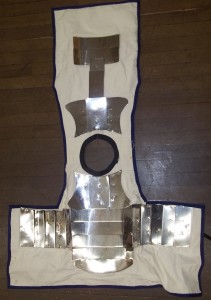
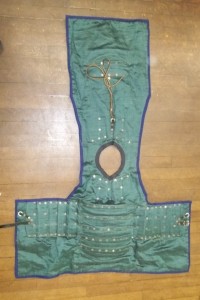
As part of my class on “what does armour weigh” last weekend, I had a friend bring the coat of plates that I built for my wife (before she was my wife) about 15 years ago. This time I remembered to take pictures, which folks have been asking me for repeatedly. I’m also promised pics of the current owner while wearing it, and the seamstress who helped me with this project was awesome (explaining the nice final look)
I note that have a tendency to build a lot of armour around Christmas – the last pieces being the pair of gauntlets featured Here.
In 15 years of (admittedly fairly light) use this coat of plates needs to have two rivets redone, since they have torn through the fabric, one of the “supplementary” back rivets and one of the chest rivets (both in the “corner” of their respective plates). Original construction notes follow the pictures, and I haven’t changed the text from my Posting (other than fixing the typos) on Arador many years ago. That said I have learned a few things since…
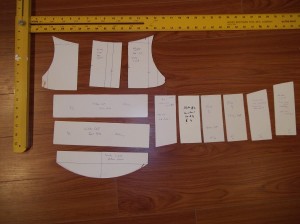
Like perhaps posting the pattern along with the text is a good idea!
For those of you who are relatively new to this, the main points where experienced armourers are likely to smirk a bit (and that you should be aware of) are the reasons that armour went from small plates to big plates (due to metallurgy advances – see Alan Williams’ papers, although to my credit I wrote this before “The Knight and the Blast Furnace” was published). As for the “studded leather” effect, compare the rivet patterns to those on the Effigies and Brasses site in the mid-late 14th century (which are similar to those that Ffoulkes and Ashdown based much of their work on) and the whole “studded leather” controversy may be easier to explain.
The Original Post…
Just finished a (slightly modified) Wisby Coat of plates as an Xmas gift for my wife… Since the fabric part of the Coat of Plates was made a bit small, I added 2 plates (similar to the front plates) to the back (covering the kidney area) as well as copying the front triplet of plates to cover the shoulder area, and a couple of plates down the spine. (Yay Paranoia 😉 I will likely *NOT* re-enforce the kidney area in future, but the additional spine plates don’t show if the coat is properly overlapped, and the “shoulder” plates add some nice rigidity and keep the back from “slumping” when you tie the three loops together (If you don’t know what I mean, look at the back of a properly reconstructed Wisby Coat: there is a tie that describes a triangle in the back) In addition, the extra weight balances the front a bit better, since the “correct” coat of plates is a bit front-heavy (55-60% of weight distributed to the front)
As a result, my right hand is officially toast as of tonight: the coat of plates has ~170 rivets in it, all damn hard medium-carbon steel. I would strongly recommend NOT trying to build one of these beasties on the only day that you can get off work that your significant other is working, ESPECIALLY if that day happens to be Xmas eve 😉 Note that the pattern and “foundation” garment were made before today, as well as annealing more than 2 Lbs of nails/rivets, but 10+ hours of cutting, punching holes and riveting, or (worse) CLIPPING rivets just kind of sucks: much better spread over 2 days!
Useful sources / things to do better next time
On the plus side, arms and armour of the Medieval Knight has a WONDERFUL diagram of all of the rivet holes (and thus the riveting pattern) for one of these armours: note comments on the density of rivets later in this diatribe. I’ve also figured out most of the bugs in the pattern, so it will be MUCH easier to do another one (fitted to the correct size of person) Almost makes me consider 14th century armour. An important note: If you’re going to use a fabric base, stitch the layers together (like quilting) with a cris-crossing pattern of stitching so that your largest area is about 3″ x 3″ If you don’t the holes you punch for your rivets won’t line up through all of the layers of fabric: a major frustration, and not something that you can fix once you have a few plates riveted on 😉
Cost
The actual “money” cost of this thing (a prototype in canvas and stainless steel) came to less than $20 (Canadian!) 4 layers of light-to-medium weight canvas for the coat plus a “surface” layer (on sale: $8.00 total) 3 1/2 square feet of 20 Ga stainless steel (“scrap” at $2.00/lb: another $7.00. Double this if you get it new) Add about 1 1/2 Lb of roofing nails for rivets (~$3.00) 1 buckle, 3 x 1/2″ “lock” washers and some strapping. (…and about 3 person-days) and you get a reasonable looking coat of plates.
Musings on “studded leather” and rivet densities
I have a sneaking suspicion that this type of armour is what D&D decided was “studded leather” since the rivet heads cover a significant portion of the surface, and likely help protect the “fabric” part of the armour from damage (in period this would likely be leather: I’m waiting on my copy of the Wisby reprint 😉 This is is SERIOUS contrast to the “Coat of Plate” armours that I see in re-enactment communities (The SCA in particular) where the plates tend to be quite large, and are held on by 2 or 3 rivets. I am usually impressed when I see a coat of plates in the SCA with more than 40 rivets (total) in it. Working out the “period” ratio, ~500″ square/170 rivets = 3″ square per rivet! since a rivet head is about 1/4″ square this means that almost 10% of this garment is rivet head! a pretty impressive contrast with the very sparse 20-40 rivets seen on “re-enactment” harness (1-2.5% coverage)
It’s also probably worth noting that the rivets (even after cutting them down to almost nothing) probably add about 1/2 Lb to the weight of the armour: this is quite a considerable fraction, since the metal weighs about 3 Lb, (fabric is ounces!) so rivet weight is about 15% of armour weight. If I had used “period” metal weights and leather, then the rivet (nail) weight would likely still be adding 5-7% of the total weight of the armour: a fairly considerable chunk.
“Appropriate Technology” for the 14th Century
The other thing that I noticed was the incredibly small amount of metal wastage: the metal I used was a 2′ x 4′ piece: of that I used a 2′ x 21″ chunk, and my total wastage was about 8 square INCHES. “So what?” you might say. In the 14th-15th century, the single most expensive part of this armour would be the “sheet” metal (whether originating as hammered sheet or iron billets) this incredibly small amount of wastage would be quite significant in the economics of production (since labour costs would be almost inconsequential for such “munition” armour) and most of the metal “lost” in the holes (which would likely have been punched) and the “trimmed” rivet ends would be re-forged into more “arming nails” (rivets) or even into sheet. Impressive application of “appropriate” technology, and I certainly wouldn’t have thought of these ramifications if I hadn’t tried building one of these according to the “period” pattern.
Conclusion
I’ve always liked the “knight in shining armour” image of the medieval time period: now that I have had the opportunity to study the evolution of armour, I can say that the period that really holds my attention is post-transitional, before portable firearms became common. (Translation: the 100 years war +/- 50 years) In concentration on this time period to the (oblivious) exception of all others, I have missed some really interesting stuff, like the compromises armourers (or more generally people) had to make according to the technologies and materials they had available. It’s all well and good to build a breast and back from 32 square feet of steel, leaving 1/3 or more of it on the floor, but before sheet steel was readily available, armourers had to make do with what was available, and the armours of those eras (and how they were executed) tells us an amazing amount about the period. While I “know” that steel (or iron) was less common before the introduction of the “white harness” that I love, until I built a piece of “transitional” armour dating from before this period, I did not have a visceral grasp of this. Not until I looked around the base of my beverly shear after over an hour of cutting to find about 10 small scraps of steel did this really hit home: that much time cutting “gothic” patterns I would have had to pause to clean up jagged slivers, or risk punching some of this scrap through my shoes!
So I am appropriately humbled, and find myself asking an interesting question: did “white harness” come about (as all the history books seem to indicate) as a result of technological innovation and a need to defend against ever improving weapons, or did this armour (and indeed the weapons themselves) come about simply because Ferrous metals were more readily available than ever before. It takes a lot of good quality steel to make a bastard (or 2-handed) sword: considerably less to make a broadsword… and there is roughly the same kind of materials ratio between a breast and back and a coat of plates.
Just something to consider
Scott Martin


How much overlap do you use between the plates? I just ordered a kit from Polar Bear forge. If I overlap the stomach plates over the rivets, I have to use five stomach plates. If I overlap them minimally, I can use four.
Hi Zorikh
I use enough overlap so that the rivets are covered by the plates. While it is possible to use less, the extant examples used this much, and with this much overlap there is minimal wear on your underlying garments, and the coat of plates is comfortable to wear. You could reduce the overlap and countersink the rivets, then grind them flush, but personally I’d use the extra plate and save myself a pile of time.
Scott
I never believed I would need to be familiar with this, but thank goodness for the web, right?